Before I started all this, I was thinking (or better said, fantasizing) of bringing together a plan, sorting down the things to do step by step, preparing a simple system to track the needs for further action and replacements, etc. - seems like a bit of a professional deformation. Sounds shiny and cool, but guess what I actually did!
That's also the reason why I have been neglecting the blog. I simply grabbed the wrench and started jumping on every single bold that I could see. You can't find much better things to do in the evenings, especially when it's around -15 degrees outside and your car is almost literally buried under snow. As I remove parts, not only did it make me scared because of the increasing complexity of the job, but I became more and more excited to move on to the next step. I must say that due to my lack of experience and know-how, I'm progressing rather slowly, but in general the mechanisms are designed in such a simple and smart way, that it shouldn't take a well trained specialist more than just a few hours to remove every single nut and bolt on the bike, and then to put it all together again.
As I don't have a proper bike stand, the Bimmer should keep standing by itself. Therefore I left it standing on the center stand (and front wheel) and I started working from rear to the front. I would start with the rear wheel, seat, fender and suspension, then continue with the final drive, tank, then take out the transmission and the engine and finally take care of the front wheel, forks and steering head. The rest of the work will be on the workbench, although they are the best looking parts from outside, I won't feel comfortable without looking into the engine, the tranny, let alone the wheel hubs and bearings in case there's anything wrong.
Common sense tells to start with the rear wheel. It was supposed to be extremely straightforward. Remove the axle clamp, then the axle bolt and simply pull the axle out of the wheel. There is even a hole drilled into the axle to pull it easier.
But how it actually ended up? It took me maybe hours (or it felt like that) to wrestle with the damn axle. When I tried to pull from where I'm supposed to, it hardly moved. Then I took my hammer and the drift and started hitting from the other side as hard as I can. Even that didn't help much more than a few centimeters. At the end, I had to pull out my secret weapon: WD40! A good deal of WD40 here and there, avoiding the brake pads, more and stronger hits with the hammer, with a bit of swearing, and the axle was finally in my hands.
Here's a smart design feature for you. Say, you pulled over with a flat tyre and you have to remove the rear wheel to fix it. You simply removed the axle bolt and clamp, pulled the axle out, and? The wheel needs to get out of there and you can't simply grab the 150kg bike and raise it to reach it, right?
Simply loosen two bolts on the rear fender, then upwards folds the rear part of the fender, via a hinge. Just roll the wheel out of the "backdoor".
Here's why the rear axle was so stubborn. It seems that the wheel bearings are pretty much demolished. It will take a thorough post-mortem to understand what actually went wrong, but all the bearings will be renewed in any case.
But it wasn't a safe ride at all. See that groove at the middle of the axle? It shouldn't exist at all! Whatever went wrong in the wheel hub, slowly but steadily ground the axle by a millimeter or two, which is made of hardened steel and possibly one of the strongest parts on the whole bike. Luckily, it wasn't so fast a progress, I can't imagine what would have happened, if the axle had broken on the way and locked the rear wheel.
Let's take the exhaust muffler out of the way. As I mentioned before, it is not the original part. Furthermore, it is very ugly and sits rather loosely. It will be dumped into the trashcan, together with the pipe, and replaced with an original replica.
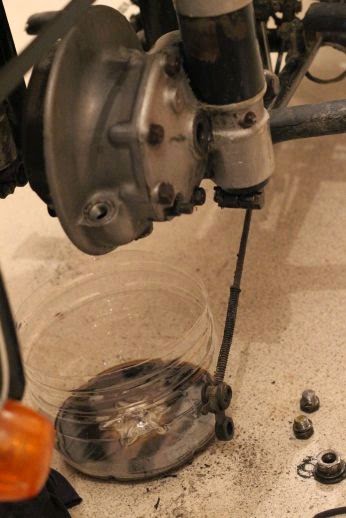
Let's leave the wheel aside, until the workbench gets ready for the detail job and move on with the rear suspension and the final drive. I begin with draining the final drive oil. It's quite neat, actually, there's two plug bolts on the final drive, the one you can see in the picture to fill in oil, and the other one at the bottom to drain. I haven't drained the engine and transmission oil yet, I think I'd feel much better after I make a compression test and see the actual situation inside the engine block.
Moving on with the rear suspension. I must say that I found this design really smart, too. Modern motorbikes have their rear wheels bolted onto a "fork", which is attached on one end to the main body with an axle. The fork plays freely on that axis up and down. The rear suspension, consisting of a strong spring and a shock absorber, is placed in such a way to damp this movement attached between this fork and the main body.
This one does not have a rear fork, though. The rear wheel is attached right to the rear suspension and can freely move up and down on the center axles of the suspension tubes. There is a spring to resist this upwards movement, and gravity handles the rest. It may not be as effective and strong as its grandchildren, but definitely much more beautiful as a design.
The suspensions are attached to the chassis by two clamp bolts on top and bottom. Removing them and the poor old and rusty top cover bolt will reveal the center axle of the suspension. Then I should simply punch the axle out of the clamp to take the suspension out of its place.
See the top cover? When I'm done with it, it will be back in its old bright and shiny days.
See the clamp bolts removed, and the axle below the top cover bolt? Should be a piece of cake to remove it now... In theory, at least.
As you might have noticed, I'm telling about the internals of the bike as if I've spent all my life working with them. Well, I haven't, but it's one of the reasons why I chose a BMW for my first try as I wrote in my first blog. There is a huge source of information and documentation out there. It does not take more than a minute to access the parts catalogue of a vehicle produced in 1954.
Let's stop here. In fact, I've advanced more than I wrote so far, but I'll need my lovely photographer to work a bit more in order to continue with the story.


No comments:
Post a Comment