I think I'm still scared to remove the engine block. The funny thing is, I'm not scared of screwing it up, but when it's done, I'll have to go buy the necessary parts and start with the paint and nickel plating jobs. I'm happily working at home, but when it comes to running around out there, I simply succumb to my laziness.
So instead of killing time, I thought I can take some little steps. I could take care of the small things and then start with the electric wiring, which is no more than a handful of wires going from one end to the other.
I got rid of the cheapo Chinese handle plastics, and in the meantime removed the clutch and throttle wires from the levers. There remains only the barenaked bar itself except for the again cheapo Chinese signal and horn switch. I still don't know how it originally was (horn and long beam, if at all) but I am sure I can find a nice looking part for that.
I still don't feel confident to mess with the carb, so instead of completely removing it, I just tied the throttle cable after freeing it up from the handle.
The top clamp of the engine headers also requires a good deal of cleaning and polishing. Not my biggest concern at the moment.
The bike is altogether very simplistic. So is the engine block. It takes only the two bolts each side, one also holding the crashbar, and the other is right below the exhaust screw, to the front of the lower block. It's hard to postpone it any further, to be honest.
Even they will not be sitting ducks, but I will remove the kickstarter and gear shift pedals before taking the engine onto my workbench.
The yellowish plastic cap above the block is the cover of the neutral indicator connection. You can see the wire, just below it. It's good to take these photos during the removal, I'll surely need them while I'm bringing everything back together.
Now this is interesting. I mentioned about the rear wheel before, that it has some serious issues, even damaging the wheel axle. As I kicked it away from where it has been lying since I first removed it,, these guys fell out. They should have been sitting in the bearings that they belong to, not messing around on my floor. Apparently all the bearings are indeed shot.
The battery rack is quite rusty, probably because of being exposed to battery acid every now and then. Not a big deal, after some WD40, sandpaper and painting, it will look as brand new.
The air filter is also out now. It is connected below the tank with a clamp. It is not that visible on the /3 models, but I still want it shine.
There is a glovebox to the left of the tank. It's quite large and practical, especially considering that many of the stock BMW models do not have any such free capacity at all today. The lock is functional but the part holding the lid is damaged because of rust. It needs to be repaired before the paint job. So do the attachments holding the plastic kneepads on both sides of the tank.
Let's get back to the dishes. This one is just a reminder of the how the rear suspension looked like. By the way, I feel that this one is not coming only from the suspension, but the final drive seems to have leaked. But this is what needs to be cleaned.
A closer look... A genuine chemical stuff, consisting of mud, dirt, rust, grease getting collected in decades...
And this is how it looks when cleaned. It was sitting in the water with detergent the past few days. Out of its bath, it took just roughly wiping here and there to make it shine. I'll do the same treatment to the other side with the final drive and the oil pan below the engine, which is also pretty dirty.
This is my fourth round of water. It is now fairly clean, but there is still enough remainings of grease hidden in the far away corners of the parts.
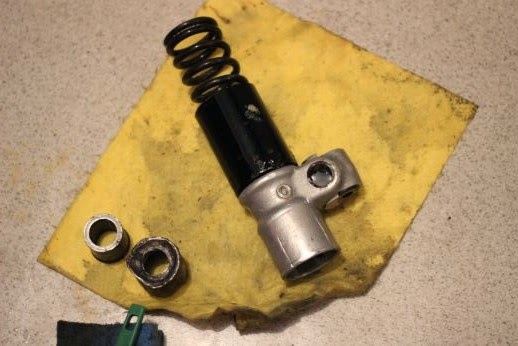
Here's another part that I have to replace. It got loose from the bottom end of the suspension after the clean up. It used to have a proper cylinder shape, half a century ago. Together with the rubber seal, it's supposed to hold the suspension grease inside. I could put it back into the suspension but it will be totally useless this way.
I'll leave the rest of the cleaning after I open up the final drive and the engine. I now know what to do anyway. Should be fine. Let's move on with the electrics.
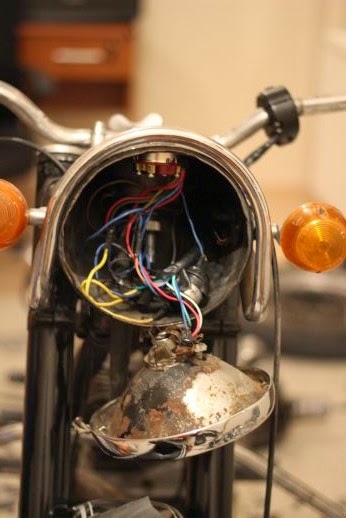
Starting with removing the headlight. And it will end almost right away, all the "on board electronics" are stuffed into the headlight case.
Here it is. On top, the ignition switch, headlight wiring, the speedo and its wire to the behind. (which is mechanical, by the way) The flasher relay right behind the headlight wires is added afterwards for roadworthiness.
The headlight does not brand new either, but it should be one of the easy problems.
The overall look did not change significantly. Next, I'll completely remove the headlight and all the wiring.


No comments:
Post a Comment