As my half improvised special tools served their purpose perfectly, there could be only one place that I had to head to. The metal shop again...
 I've got two important things to do on the crankshaft: to replace the cracked piston arm and to renew the three bearings on the main shaft. The piston arm rolls on a little shaft which is attached tight fit on the crank body. So I simply cannot move it at all. (I don't think I can convince my wifey to the idea of a hydraulic press in the house!)
On top of that, I don't have a proper drift to punch the bearings onto the main shaft.
So to the metal shop. Taking the arm shaft off the crank was a piece of cake for the hydraulic press. I replaced the special rollers below the arm, replaced the three bearings and came back home. I didn't take any photos there - my bad...
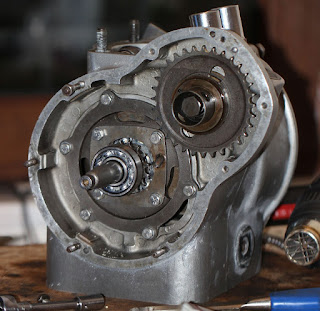
 I have already cleaned up and polished the engine block. There isn't a lot to do for the scars of the past half century, but the view after removing all the dirt and oxide layer is lovely indeed.
I tore out the rear oil seal, which isolates the clutch and put in a new one. That's the shorter side of the crank shaft in the above photo.
That's where the motor oil circulates, it should never escape through any of these two seals.
 The rest went pretty easy... I first heated up the engine body and carefully inserted the now renewed crank shaft into its bed. Screwed new bolts in...
You can notice the remainings of the metal polish in the photo, that I rubbed rather lousily. It's okay, I'll clean it thoroughy after the assembly is over.
 After mounting the main seal cover plate, I'm done with the crank shaft. Or with the front side of it, to be precise...
 The camshaft is easier. I heated up the engine body again, put the shaft in and fastened with two screws.
So I've got just one tiny little obstacle remaining before closing the engine front cover. I'll tell about that shortly...
 But before that, lets turn the block over. I put the flywheel on the rear shaft and tighten the big nut. That's the tightest nut on the whole vehicle; the service manual says 170 Newton.meters of torque. (More or less translates into myself jumping on the handle of the wrench, in real world terms) I only managed to achieve about 130 Nm. Well, could have been worse...
 As an additional security measure to avoid the nut loosen up, I folded a side of the large washer below it and pulled it as close to the nut as I could.
That's also the last appearance of my "special tool" to fix the crankshaft with the engine body.
 and the clutch pad on top of it, and screwed onto the flywheel with six (brand new) bolts. The clutch is done.
There are two valves on top of the cylinder (four, even five in modern engines) to take in the air-fuel mixture and dispose of the exhaust gas. Their opening/closing timing is critical for a healthy operation, or even avoiding a self destruction.
The crankshaft drives the camshaft via the smaller sprocket in the photo, over the cam chain and the large sprocket at the end of the cam shaft. The valves make one full cycle for the piston's two cycles.
The exact position of these two shafts has to be adjusted very precisely, to achieve the proper valve timing. And it's safer to do it with the cylinder and piston mounted.
Here comes the but - I should have cleaned and painted the cylinder block first! As I cannot play with all those toxic and stinking chemicals (paint remover, thinner, spray paint to name a few) in the house, I should now wait for a good weather in a weekend. Worst case, I will put the engine aside as it is and skip to the gearbox. I have to do that anyway...
At least, this was a pleasing progress so far.


No comments:
Post a Comment