After weeks of scorching hot, finally a good opportunity to get outside and make use of the stuff I have been shopping around...
The day may well end up as great fun, or as a complete disaster. My grinder is getting out of its box...
It's time I got rid of the three ugly iron foot pegs, one welded instead the left passenger bracket and two next to the rear shock brackets, for the comfort of the second passenger! Let's see how it will work out...
No, I'm not confident at all - I've never needed to do any metal work ever. This will be my first serious experience with the fancy power tool.
I'm aware that it is not a toy. I don't want to get myself into stupid trouble, so I've got my plastic eyeglasses, good and comfortable working gloves and an old Buff as my "protection gear". I had a mask as well, but it directs my breath right into the glasses they get fogged up like crazy. Ridiculous...
Anyway, it's the Beemer who's in real deep trouble, not me.
I begin with the cut off wheel. First I'll get rid of the chunky parts of the pegs and then go on with finer work. The power tool is indeed so powerful, cuts through the strong iron like butter.
Great power comes with great responsibility. Especially the rear pegs are located in a crowded position and it's pretty narrow to work in there. If I accidentally touch the frame, there may be no way back. I must work very carefully.
First I cut off the chunky and easy part of the left passenger peg, observing and getting used to the behaviour of the grinder in the meantime.
The colours in the cutting surface can give an idea how hot it gets during the work.
And this is the second passenger's left footpeg.
The grinder is actually quite aggressive. If I cut too deep, the powerful rotating disc catches traction on the side walls of the cut and throw my hand in the direction of rotation. Not hazardous for myself at all, but the sudden loss of control may may dent the frame at an undesired location. So I proceed parallel to the frame as much as I can, then vertically cut off the piece hanging above the dent. This makes my life pretty easier.
This is the right side. It's even more difficult here, there's the rear shock lower bracket on one side and the sidecar mount on the other. The mount is not needed, but leaving a visible damage for nothing would be pointless.
With that method, I removed most of the bulky parts.
As I didn't ever properly cleaned the frame, the shock mounts are covered with the old grease almost all over. As I work with the grinder, the grease melts dowm and starts dripping. Even with my thick work gloves, it gets way too hot to hold the frame around the working area.
This is the best I could achieve with the cut off tool. Let's get to the second stage.
I remove the cut off disk and take the grinding disc, which is thicker and stronger. It's easier to use, does not have sudden aggressive reactions and as it is only for grinding, I can take different positions as I prefer and make use of most of the surface.
So I managed to have a fairly smooth surface with just a little bit of fine work.
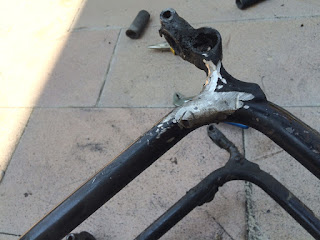
And this is where the broken passenger peg bracket was. I like the result here, too but I didn't work too precisely here. I'll find the bracket from a donor and have it welded here, so the work will depend on its shape.
I'm not saying that I did a perfect job. No, I had a couple accidents and harmed the frame here and there, but they are not critical damages at all. Will not be noticeable after the paint job.
And lastly, a before - after comparison.
The large disc on the right is the grinder and the one on the left is the cutter. When I started working, their diameters were equal!
By the way, you don't notice at first, but the machine is pretty heavy already with the rotating mass, and puts the right wrist under huge strain. As the work is completed, my right hand became almost totally numb.
I'm very happy with the outcome. I learned dealing with the grinder, which is not so difficult to use, and I got rid of a significant step that I should have done long time ago. Now it's only up to the missing bracket to go into the sand blasting and paint job.


No comments:
Post a Comment