So you thought it was just as simple as pushing the fast forward button and that's it? No sir, you're wrong... Quite badly...
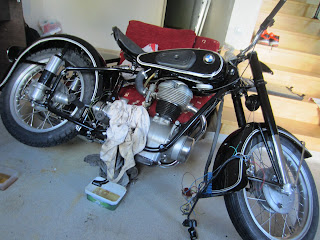
Our reunion after about two months was not that promising at all. I am not caught by surprise, though - the last couple days before my departure already gave me a hint about how I was going to find the Beemer on my return. So I am well prepared.
Let's take a look at the engine first. It already started leaking, and I just hit bull's eye with the ice cream box (my favorite one). Not a single drop outside.
Obviously, at the beginning, the roughly 1 liter of oil in the box was IN the engine. That means, not much is left in the engine from the actual capacity of 1,25 liters.
We'll get back here. Now let's move on.
Final drive is the next stop. It too was dripping and awarded a box - unfortunately not ice cream this time. Wish I had even more of it when I had the chance...
If I remember correctly, the final drive takes around 200 ml of oil. This means, it's drained completely, too. But into a spot on box again!
Not over yet...
Now, this was a bit unexpected... See the puddle under the wheel? The right side fork has a leak, exactly where it should have been sealed by the rubber ring. This needed a box as well.
Anyway, I think I's better clean up the mess first...
Don't look for exotic causes for the leaks; it all comes down to the old Beemer being old! Let's get back to the engine for a closer look.
But first I need to make up some space below the oil pan. I don't want to lay the bike down entirely, so I carefully gave it a comfortable lean on the couch with a metal frame and rather stiff filling. Should do the job well.
I removed the oil pan. You see the bolt holes, the two on the top right in the photo (that is, front right corner of the engine) are worn. The engine is made of aluminium alloy, which is a soft compound. Screw the bolts too tight or skip the grooves just a couple of times and that's enough to ruin the holes. Given 62 years of lifetime, it's quite likely.
One solution would be to remove the engine completely or somehow take the entire bike to a specialist...
But here is my solution - the Helicoil kit. I was useless with taking photos, so you'll need to bear with my explanation instead.
First of all, you drill the bad hole with the provided bit, which is just slightly bigger than the hole diameter. (Not in the photo, it was already attached to the drill, I guess.) You need to keep it aligned or make things worse. That's why I leaned the bike over the couch, I needed room for the drill.
After that, you groove your new hole using the provided guide. This can be tricky, too. You need to align it well, especially at the beginning. The rest is easy.
One of the steel inserts in the photo above will be screwed into the hole using the tool looking like the number 7. They have a little extension to sit into the slot at the tip of the tool. When it gets into the right depth, you simply snap that extension with the straight tool. Here is our new bolt hole...
And even stronger than ever. I had another broken bolt in the wheel hub, now that I get hold to the Helicoil, I fixed that, too. The photo is from the drilling stage.
I think that's a good explanation why I didn't take proper photos. Because it's so much fun, fixing bolt holes with this little smart toolkit. I know that doesn't sound mentally very healthy...
The result is good, though, isn't it?
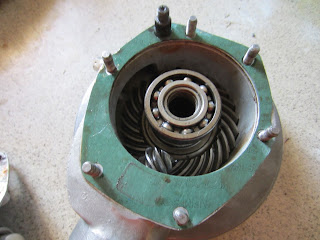
Now to the final drive. Compared to my first attempt, this time it was child's play to remove and split it apart...
Nothing visible. I guess it's just tiny little scratches and impurities piled up on the mating surface that lead to a leak.
Carefully removing the paper gasket, I sandpapered the surface using a small wooden block to support.
And in addition to that, I applied a thin layer of liquid gasket. It's a toothpaste like red paste (don't know why I bought red, it had other colours, too) sold in a tube, once it gets into air it becomes like rubber in a short time.
That much should do the trick.
By the way, the engine oil pan had its share of the liquid gasket, too.
I'm still not sure about the front fork. I removed it and sandpapered the sealing surface inside of the chrome stanchion, supported the sealing surfaces below the screws at the bottom with some liquid gasket and that's all. If the stanchion is bent or scratched significantly, I won't be able to stop leaking without replacing it.
We'll see that in time, but now I've got more serious stuff to do...


