Thursday, January 29, 2015

Back to the School

As I had a mandatory time-out for the dismantling job, I thought it's a good opportunity to make use of this break with something smart.

Got some new toys recently. This means, now I am able to get some idea about the health of the engine. The simplest way to do that is by using the so called "engine compression tester", which I bought on the internet, instead of having a 15 minute ride just because of laziness - once again. Don't be fooled by the fancy name - it's just a pressure gauge, connected to a high pressure hose and a tight connection with an o-ring.

Let's remember how an engine works. There is a cylinder bored inside that big metal chunk, and a piston inside that, running up and down like crazy. As the piston goes down, the air-fuel mixture coming from the carb fills in the volume - so called "combustion chamber". Then, the piston moves upwards to compress the mixture in the combustion chamber. When it reaches the top, the spark plug ignites the now pressurized mixture and that energy pushes the piston downwards again. Lastly, the piston goes up to dispose of the exhaust gases of the combustion. And it goes on and on and on until you're out of gas... I think you can find this explanation in any driving license exam preparation material.
We're concerned more with the part of the cycle that we compressed the air-fuel mixture. Now we can get rid of the license exam preparations and find a high school chemistry book. You must be able to find the formula "PV=nRT" somewhere. In plain English, it says, if the amount of gas and the temperature is not changing, reducing the volume will end up increasing the pressure at the same rate. That sounds a lot like inside our cylinder.

The engines have a parameter called "compression ratio", meaning, how much the piston compresses the combustion chamber during the upward movement. Roughly speaking, a high compression ratio means a high power generation. This value is around 10:1 in modern gasoline cars and around 12:1 for the bikes. On the other hand, my poor old beemer has a compression ratio of 7:1. That is, the piston squeezes the inside volume to one seventh of it, consequently, the pressure will increase to seven times of the initial pressure, which was 1 Atmosphere. (About 15 psi). So what I am looking for is that the inside pressure should be somewhere near 7 Atmosphere.

Okay, now you can dump the chemistry book in a nearby trash bin. 

I removed the spark plug, and connected the end of the tester into the spark plug hole. It's a simple procedure, I'll kick start the engine a few times, of course without gas and spark, and check the pressure. If everything is intact and the combustion chamber is well isolated, I should see a value somewhere near 105 psi. Otherwise, it means that there is a leak somewhere in the system, and the engine performance is reduced accordingly.

Big disappointment. I hardly got up to 55 psi. I was even able to hear a leakage somewhere around the cylinder head. But then where is the problem?

Basically there are two points that the combustion chamber can leak. First, the metal seals around the piston and second, the engine head cover, the gasket and valves over there. Now we know that the cylinder is leaking, in the second step, we try to eliminate the latter possibility. 

I then remove the tester from the spark hole and put a little bit of motor oil inside. Thus, the oil will stick on the cylinder wall and form an isolation layer. So if the problem is with the piston seals, this additional layer should improve the isolation and we should see a higher pressure in our second measurement. But I don't like what I already heard in the first test at all. Not so optimistic for the second run.

As I guessed, the second measurement remains the same as the first one. This means that I should have a thorough look into the cylinder head cover and the valves when I open the engine up. The gasket is not an issue, it will be replaced anyway, but if it's the valves or the cover itself, than that means trouble.

In the school times, we all used to hate this stuff and ask what the hell all this is good for. This was a good use after 20 years...


Saturday, January 24, 2015

Little Bits and Pieces

I think I'm still scared to remove the engine block. The funny thing is, I'm not scared of screwing it up, but when it's done, I'll have to go buy the necessary parts and start with the paint and nickel plating jobs. I'm happily working at home, but when it comes to running around out there, I simply succumb to my laziness.

So instead of killing time, I thought I can take some little steps. I could take care of the small things and then start with the electric wiring, which is no more than a handful of wires going from one end to the other.

I got rid of the cheapo Chinese handle plastics, and in the meantime removed the clutch and throttle wires from the levers. There remains only the barenaked bar itself except for the again cheapo Chinese signal and horn switch. I still don't know how it originally was (horn and long beam, if at all) but I am sure I can find a nice looking part for that.
I still don't feel confident to mess with the carb, so instead of completely removing it, I just tied the throttle cable after freeing it up from the handle.

The top clamp of the engine headers also requires a good deal of cleaning and polishing. Not my biggest concern at the moment.
The bike is altogether very simplistic. So is the engine block. It takes only the two bolts each side, one also holding the crashbar, and the other is right below the exhaust screw, to the front of the lower block. It's hard to postpone it any further, to be honest.
Even they will not be sitting ducks, but I will remove the kickstarter and gear shift pedals before taking the engine onto my workbench.

The yellowish plastic cap above the block is the cover of the neutral indicator connection. You can see the wire, just below it. It's good to take these photos during the removal, I'll surely need them while I'm bringing everything back together.
Now this is interesting. I mentioned about the rear wheel before, that it has some serious issues, even damaging the wheel axle. As I kicked it away from where it has been lying since I first removed it,, these guys fell out. They should have been sitting in the bearings that they belong to, not messing around on my floor. Apparently all the bearings are indeed shot.
The battery rack is quite rusty, probably because of being exposed to battery acid every now and then. Not a big deal, after some WD40, sandpaper and painting, it will look as brand new.
The air filter is also out now. It is connected below the tank with a clamp. It is not that visible on the /3 models, but I still want it shine.
There is a glovebox to the left of the tank. It's quite large and practical, especially considering that many of the stock BMW models do not have any such free capacity at all today. The lock is functional but the part holding the lid is damaged because of rust. It needs to be repaired before the paint job. So do the attachments holding the plastic kneepads on both sides of the tank.
Let's get back to the dishes. This one is just a reminder of the how the rear suspension looked like. By the way, I feel that this one is not coming only from the suspension, but the final drive seems to have leaked. But this is what needs to be cleaned.
A closer look... A genuine chemical stuff, consisting of mud, dirt, rust, grease getting collected in decades...


And this is how it looks when cleaned. It was sitting in the water with detergent the past few days. Out of its bath, it took just roughly wiping here and there to make it shine. I'll do the same treatment to the other side with the final drive and the oil pan below the engine, which is also pretty dirty.
This is my fourth round of water. It is now fairly clean, but there is still enough remainings of grease hidden in the far away corners of the parts.
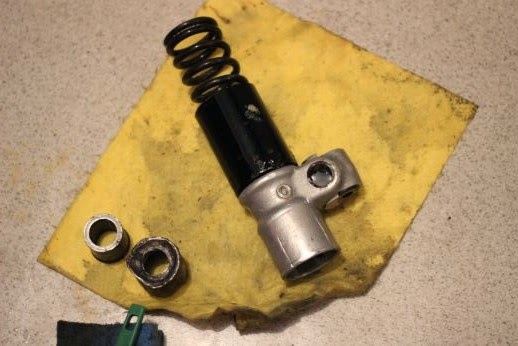
Here's another part that I have to replace. It got loose from the bottom end of the suspension after the clean up. It used to have a proper cylinder shape, half a century ago. Together with the rubber seal, it's supposed to hold the suspension grease inside. I could put it back into the suspension but it will be totally useless this way.
I'll leave the rest of the cleaning after I open up the final drive and the engine. I now know what to do anyway. Should be fine. Let's move on with the electrics.

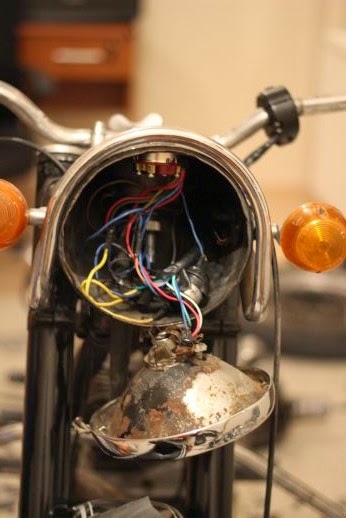
Starting with removing the headlight. And it will end almost right away, all the "on board electronics" are stuffed into the headlight case.
Here it is. On top, the ignition switch, headlight wiring, the speedo and its wire to the behind. (which is mechanical, by the way) The flasher relay right behind the headlight wires is added afterwards for roadworthiness.

The headlight does not brand new either, but it should be one of the easy problems.

The overall look did not change significantly. Next, I'll completely remove the headlight and all the wiring.


Tuesday, January 20, 2015

Let's wash the dishes

Yes, it's been quite a while since I updated my blog. I do prefer keeping here up to date, as soon as I make some progress but unfortunately as it comes to the dirty jobs, I have to keep things slow. It's really difficult to pay attention to not doing anything stupid, especially when it comes to the filthy stuff. Anyway I know I have to find a reasonable balance between doing and typing, I'll learn that.

I suffered from a big sinus infection the entire week. Strange, I was not sick at all, I was just having my brains flowing out - rather unusually. It took me a while to get why: I was spending my evenings with my nose stuck in all that dust, rust, oil, gas and whatever else there is. Even Superman would have gotten allergic in here! So I headed to the pharmacy and got myself a couple of cheapo masks to be added to my work outfit. Already feeling better...

I didn't have any surprises while removing the rear suspension. As I explained before, it took me a few simple hits to the center rods from bottom, so that the entire suspension block got loose- The right side, which is integrated with the final drive is waiting yet, as I don't want to open it up before getting a new set of gaskets. As a matter of fact, it is inevitable to renew all the gaskets in the engine block, transmission and the final drive. Need to go buy them as soon as possible.

Speaking of the transmission, to avoid the vibration and hits reaching and any related damage, the shaft is driven through a rubber joint - so called Hardyscheibe. The transmission output fits the two opposing holes, and the driveshaft fits the other two so that the rotation is transmitted - very simple and smart. It does not look unusable, but as I already have it out, why not get a new one?
The seat looked much better from above. Underneath, the view is way more discouraging. Dust collected in decades, lots of broken and lost springs, a rusty skeleton and a rotten foam.
Here is the close-up view. No wonder why I became so allergic...

Actually I still didn't change my mind regarding the seat. I find this much more comfy and practical than the single seats. The manufacurers Denfeld and Schorch-Meier produced very similar looking seats and this one must be from one of those. If only I could find an expert to replace the springs, foam and cover... There are potential alternatives, I'll check them.
Yet, I couldn't help poking the engine block. Removing the exhaust manifold, I found nothing but lots of soot. The exhaust pipe should wait its turn until I remove the crashbar, it cannot be taken out before.
It is not any better inside the engine. I guess, as it hasn't been regularly used and taken care of, the carburetor is not properly adjusted. It must be burning rich mixture for ages, that is, more fuel vapour and less air.
If I'm interpreting how the spark plug looks, it supports the rich mixture theory. I will open the cylinder and make a thorough cleaning anyway, so this is not of concern anymore, but it is obviously vital to have a healthy and well adjusted carb. I wonder if I can find a good resource to learn how to do that.

But I'm more and more impressed with the German engineering, as even in this condition, I saw the engine ticking like a clock before my eyes!
The tank is next. As I attempted to remove it, I noticed a problem that I didn't notice before. The tank has two halves extending downwards at the two sides of the chassis extending through the center. In order to enable the full capacity, two halves are connected with a hose at the very bottom of the tank, below the chassis. I can't remove the tank without removing the hose. That is, I should empty the tank first - but how? Or where? The tank is not full, but there must be plenty of fuel, considering the maximum capacity of 13 litres.

As we all know, gas is extremely caustic and you can't simply fill it in a random plastic bottle. For my personal health and safety (I'm a married man) I don't want litres of gasoline spilled around in my house.
I have a plastic jerry can of 5 litres. The best way to do the job is to use the petcock to empty the tank. After removing the hose and the filter connecting the carburetor, I held the jerry can under the petcock and started watching the dripping gasoline for hours - or it felt so. Finally, the jerry can was filled up, but the tank was not yet empty. I had no other way to reuse the jerry can, I went out and emptied it up into my car's tank. I hope the fuel was not too bad.

It's child's play to remove the empty tank; two bolts and there it goes. But I must admit that I still spilled some gasoline while removing the hose at the very bottom.
Here's the tank on the floor, with the proud jerry can next to it.
After the tank, I got rid of the battery, perfectly fitted into an Asus power supply case. The power supply rack is pretty rusty but can be used after painting. The fixing belt is missing, I'll have to find and buy one.


Here's my first casualty. That's (or was) the bolt securing the speedometer wire in the transmission. I realized that only after seeing the head of the bolt in my hand - I was pushing it in the wrong direction! I should practice recalling my left and right more often.


Let's have a break with wrenching. I made a few experiments for cleaning up the parts, and the filthy left rear suspension was just staring at me. As I read here and there, aprt from WD40, regular detergents and household grease cleaners are quite handy. So I went shopping!

Here's my dish soap, oven cleaner, cleaning gloves, dishwashing brush, Scotch-Brite and WD40. Although I "borrowed" the cleaning bucket, considering the dirt inside, it has just become another victim.
I started the attack with all the chemicals, against all the dirt and grease collected in more than half a century. It's all about patience, but I have a feeling that the result will be nice. I brushed like crazy, soaked it up with WD40, oven cleaner and detergent, and sorted it out quite a lot. I'll leave the parts in the water a few days to solve the remainings. By the way, the water in the photo is the third round of rinsing - this may give you a good idea how it was at the beginning.


Here's how the beemer looks now. Next stop: The Engine!


Sunday, January 11, 2015

Wrench on!

Before I started all this, I was thinking (or better said, fantasizing) of bringing together a plan, sorting down the things to do step by step, preparing a simple system to track the needs for further action and replacements, etc. - seems like a bit of a professional deformation. Sounds shiny and cool, but guess what I actually did!

That's also the reason why I have been neglecting the blog. I simply grabbed the wrench and started jumping on every single bold that I could see. You can't find much better things to do in the evenings, especially when it's around -15 degrees outside and your car is almost literally buried under snow. As I remove parts, not only did it make me scared because of the increasing complexity of the job, but I became more and more excited to move on to the next step. I must say that due to my lack of experience and know-how, I'm progressing rather slowly, but in general the mechanisms are designed in such a simple and smart way, that it shouldn't take a well trained specialist more than just a few hours to remove every single nut and bolt on the bike, and then to put it all together again.

As I don't have a proper bike stand, the Bimmer should keep standing by itself. Therefore I left it standing on the center stand (and front wheel) and I started working from rear to the front. I would start with the rear wheel, seat, fender and suspension, then continue with the final drive, tank, then take out the transmission and the engine and finally take care of the front wheel, forks and steering head. The rest of the work will be on the workbench, although they are the best looking parts from outside, I won't feel comfortable without looking into the engine, the tranny, let alone the wheel hubs and bearings in case there's anything wrong.

Common sense tells to start with the rear wheel. It was supposed to be extremely straightforward. Remove the axle clamp, then the axle bolt and simply pull the axle out of the wheel. There is even a hole drilled into the axle to pull it easier.


But how it actually ended up? It took me maybe hours (or it felt like that) to wrestle with the damn axle. When I tried to pull from where I'm supposed to, it hardly moved. Then I took my hammer and the drift and started hitting from the other side as hard as I can. Even that didn't help much more than a few centimeters. At the end, I had to pull out my secret weapon: WD40! A good deal of WD40 here and there, avoiding the brake pads, more and stronger hits with the hammer, with a bit of swearing, and the axle was finally in my hands.
Here's a smart design feature for you. Say, you pulled over with a flat tyre and you have to remove the rear wheel to fix it. You simply removed the axle bolt and clamp, pulled the axle out, and? The wheel needs to get out of there and you can't simply grab the 150kg bike and raise it to reach it, right?
Simply loosen two bolts on the rear fender, then upwards folds the rear part of the fender, via a hinge. Just roll the wheel out of the "backdoor".
Here's why the rear axle was so stubborn. It seems that the wheel bearings are pretty much demolished. It will take a thorough post-mortem to understand what actually went wrong, but all the bearings will be renewed in any case.
But it wasn't a safe ride at all. See that groove at the middle of the axle? It shouldn't exist at all! Whatever went wrong in the wheel hub, slowly but steadily ground the axle by a millimeter or two, which is made of hardened steel and possibly one of the strongest parts on the whole bike. Luckily, it wasn't so fast a progress, I can't imagine what would have happened, if the axle had broken on the way and locked the rear wheel.
Let's take the exhaust muffler out of the way. As I mentioned before, it is not the original part. Furthermore, it is very ugly and sits rather loosely. It will be dumped into the trashcan, together with the pipe, and replaced with an original replica.
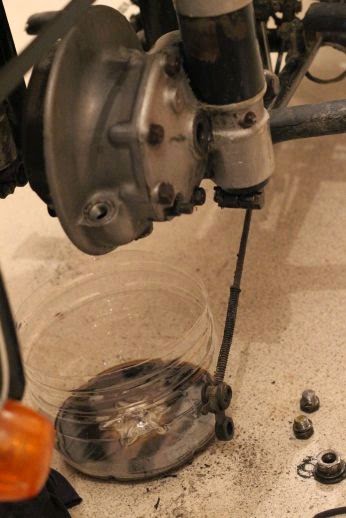
Let's leave the wheel aside, until the workbench gets ready for the detail job and move on with the rear suspension and the final drive. I begin with draining the final drive oil. It's quite neat, actually, there's two plug bolts on the final drive, the one you can see in the picture to fill in oil, and the other one at the bottom to drain. I haven't drained the engine and transmission oil yet, I think I'd feel much better after I make a compression test and see the actual situation inside the engine block.
Moving on with the rear suspension. I must say that I found this design really smart, too. Modern motorbikes have their rear wheels bolted onto a "fork", which is attached on one end to the main body with an axle. The fork plays freely on that axis up and down. The rear suspension, consisting of a strong spring and a shock absorber, is placed in such a way to damp this movement attached between this fork and the main body.
This one does not have a rear fork, though. The rear wheel is attached right to the rear suspension and can freely move up and down on the center axles of the suspension tubes. There is a spring to resist this upwards movement, and gravity handles the rest. It may not be as effective and strong as its grandchildren, but definitely much more beautiful as a design.

The suspensions are attached to the chassis by two clamp bolts on top and bottom. Removing them and the poor old and rusty top cover bolt will reveal the center axle of the suspension. Then I should simply punch the axle out of the clamp to take the suspension out of its place.
See the top cover? When I'm done with it, it will be back in its old bright and shiny days.
See the clamp bolts removed, and the axle below the top cover bolt? Should be a piece of cake to remove it now... In theory, at least.
As you might have noticed, I'm telling about the internals of the bike as if I've spent all my life working with them. Well, I haven't, but it's one of the reasons why I chose a BMW for my first try as I wrote in my first blog. There is a huge source of information and documentation out there. It does not take more than a minute to access the parts catalogue of a vehicle produced in 1954.


Let's stop here. In fact, I've advanced more than I wrote so far, but I'll need my lovely photographer to work a bit more in order to continue with the story.